Kubernets二进制安装(6)之部署主控节点服务--etcd
Etcd是Kubernetes集群中的一个十分重要的组件,用于保存集群所有的网络配置和对象的状态信息。
整个kubernetes系统中一共有两个服务需要用到etcd用来协同和存储配置,分别是
网络插件flannel、对于其它网络插件也需要用到etcd存储网络的配置信息
kubernetes本身,包括各种对象的状态和元信息配置
Etcd是CoreOS基于Raft开发的分布式key-value存储,可用于服务发现、共享配置以及一致性保障(如数据库选主、分布式锁等)
ETCD的主要功能:
基本的key-value存储
监听机制
key的过期及续约机制,用于监控和服务发现
原子CAS和CAD,用于分布式锁和leader选举
Etcd集群规划
| 主机名 | 角色 | IP地址 |
|---|---|---|
| mfyxw20.mfyxw.com | etcd lead | 192.168.80.20 |
| mfyxw30.mfyxw.com | etcd follow | 192.168.80.30 |
| mfyxw40.mfyxw.com | etcd follow | 192.168.80.40 |
温馨提示:这里部署文档以mfyxw20.mfyxw.com主机为例,另外两台主机安装部署方法类似
1.创建生成CA证书的JSON配置文件
[root@mfyxw50 ~]#cat > /opt/certs/ca-config.json << EOF
{    "signing": {        "default": {            "expiry": "175200h"
        },        "profiles": {            "server": {                "expiry": "175200h",                "usages": [                    "signing",                    "key encipherment",                    "server auth"
                ]
            },            "client": {                "expiry": "175200h",                "usages": [                    "signing",                    "key encipherment",                    "client auth"
                ]
            },            "peer": {                "expiry": "175200h",                "usages": [                    "signing",                    "key encipherment",                    "server auth",                    "client auth"
                ]
            }
        }
    }
}
EOF

温馨提示:1.server段:启动server端需要证书2.client段:客户端连接server端需要证书,server端连接client端不需要证书3.peer段:两边互相通信都需要证书(服务端找客户端需要证书,客户端找服务端也需要证书)

client certificate:客户端使用,用于服务端认证客户端 如:etcdctl、etcd proxy、fleetctl、                    docker客户端server certificate:服务端使用,客户端以此验证服务端身份 如:docker服务端、kube-apiserver
peer certificate: 双向证书,用于etcd集群成员间通信
2.创建etcd证书请求文件
[root@mfyxw50 certs]#cat >/opt/certs/etcd-peer-csr.json << EOF{    "CN": "etcd-peer",    "hosts": [        "192.168.80.10",        "192.168.80.20",        "192.168.80.30",        "192.168.80.40"
    ],    "key": {        "algo": "rsa",        "size": 2048
    },    "names": [
        {            "C": "CN",            "ST": "GuangDong",            "L": "GuangZhou",            "O": "od",            "OU": "ops"
        }
    ]
}
EOF

温馨提示:
host段:表示您的etcd有可能需要部署在哪些主机上,有可能要部署的主机,都需要把IP填上,如果不添,它们通信就会出错,避免有机器坏了,可以部署在其它的主机上。
3.生成etcd互相通信的证书
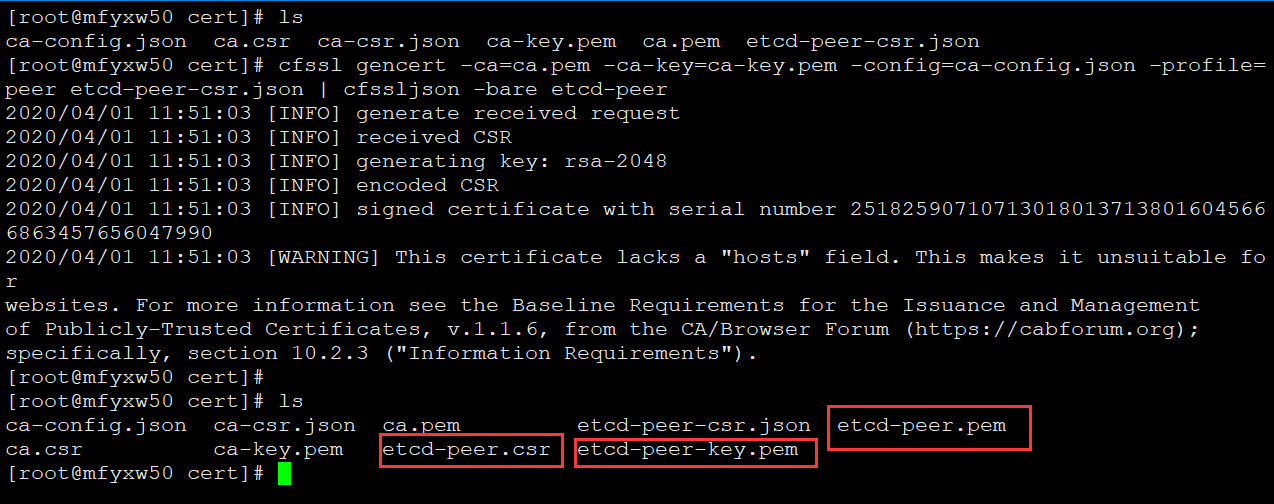
#因为etcd集群都需要互相通信,故需要使用到peer段来生成证书[root@mfyxw50 certs]#cfssl gencert -ca=ca.pem -ca-key=ca-key.pem -config=ca-config.json -profile=peer etcd-peer-csr.json | cfssljson -bare etcd-peer
4.创建etcd用户
#分别在mfyxw20,mfyxw30,mfyxw40创建etcd用户[root@mfyxw20 ~]#useradd -s /sbin/nologin -M etcd[root@mfyxw20 ~]#id[root@mfyxw30 ~]#useradd -s /sbin/nologin -M etcd[root@mfyxw30 ~]#id[root@mfyxw40 ~]#useradd -s /sbin/nologin -M etcd[root@mfyxw40 ~]#id

5.下载ETCD
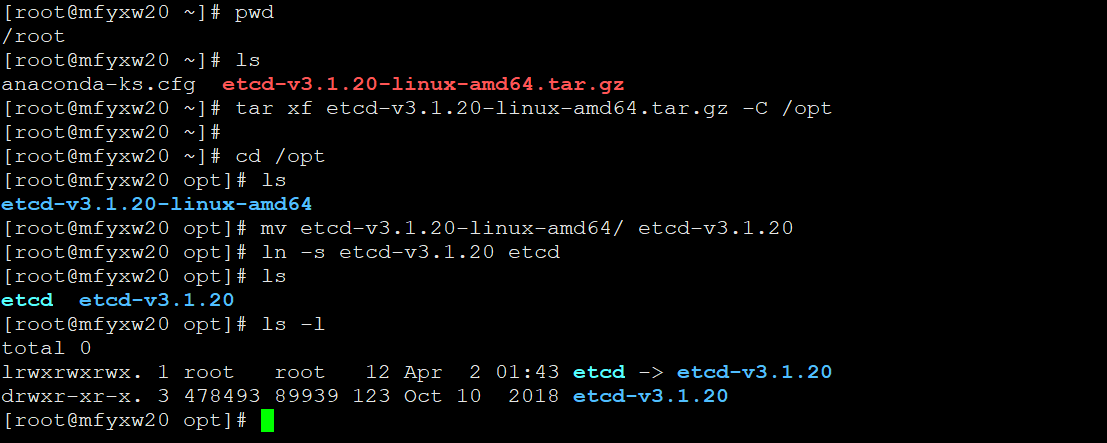
Etcd的链接地址:https://github.com/etcd-io/etcd/releases#此实验使用Etcd-v3.1.20的版本,如下是此版本的下载链接,使用wget下载或迅雷下载再上传到服务器Etcd-v3.1.20版本下载链接地址:https://github.com/etcd-io/etcd/releases/download/v3.1.20/etcd-v3.1.20-linux-amd64.tar.gz#把etcd上传到服务器并解压到/opt目录(在mfyxw20机器上操作,mfyxw30和mfyxw40都一样操作)[root@mfyxw20 ~]# tar xf etcd-v3.1.20-linux-amd64.tar.gz -C /opt[root@mfyxw20 ~]#cd /opt[root@mfyxw20 opt]#mv etcd-v3.1.20-linux-amd64/ etcd-v3.1.20 [root@mfyxw20 opt]#ln -s etcd-v3.1.20 etcd[root@mfyxw20 opt]#chown -R etcd.etcd /opt/etcd-v3.1.20/
6.将生成etcd互相通信的证书分别上传到需要安装etcd的节点上
#分别在mfyxw20,mfyxw30,mfyxw40机器上创建/opt/etcd/certs[root@mfyxw20 ~]#mkdir -p /opt/etcd/certs[root@mfyxw30 ~]#mkdir -p /opt/etcd/certs[root@mfyxw40 ~]#mkdir -p /opt/etcd/certs#在mfyxw50.mfyxw.com主机上操作[root@mfyxw50 cert]#scp -r ca.pem etcd-peer.csr etcd-peer-key.pem etcd-peer.pem 192.168.80.20:/opt/etcd/certs/[root@mfyxw50 cert]#scp -r ca.pem etcd-peer.csr etcd-peer-key.pem etcd-peer.pem 192.168.80.30:/opt/etcd/certs/[root@mfyxw50 cert]#scp -r ca.pem etcd-peer.csr etcd-peer-key.pem etcd-peer.pem 192.168.80.40:/opt/etcd/certs/

7.分别查看三台(mfyxw20,mfyxw30,mfyxw40)机器的etcd私钥是否是600
[root@mfyxw20 ~]#ls -l /opt/etcd/certs/ #以一台机器查看为准,其它二台一样

8.创建Etcd启动文件
#在mfyxw20.mfyxw.com主机创建etcd启动脚本[root@mfyxw20 ~]#cat > /opt/etcd/etcd-server-startup.sh << EOF#!/bin/sh./etcd --name etcd-server-80-20 \\
       --data-dir /data/etcd/etcd-server \\
       --listen-peer-urls https://192.168.80.20:2380 \\
       --listen-client-urls https://192.168.80.20:2379,http://127.0.0.1:2379 \\
       --quota-backend-bytes 8000000000 \\
       --initial-advertise-peer-urls https://192.168.80.20:2380 \\
       --advertise-client-urls https://192.168.80.20:2379,http://127.0.0.1:2379 \\
       --initial-cluster  etcd-server-80-20=https://192.168.80.20:2380,etcd-server-80-30=https://192.168.80.30:2380,etcd-server-80-40=https://192.168.80.40:2380 \\
       --ca-file ./certs/ca.pem \\
       --cert-file ./certs/etcd-peer.pem \\
       --key-file ./certs/etcd-peer-key.pem \\
       --client-cert-auth  \\
       --trusted-ca-file ./certs/ca.pem \\
       --peer-ca-file ./certs/ca.pem \\
       --peer-cert-file ./certs/etcd-peer.pem \\
       --peer-key-file ./certs/etcd-peer-key.pem \\
       --peer-client-cert-auth \\
       --peer-trusted-ca-file ./certs/ca.pem \\
       --log-output stdoutEOF#在mfyxw30.mfyxw.com主机创建etcd启动脚本[root@mfyxw30 ~]#cat > /opt/etcd/etcd-server-startup.sh << EOF#!/bin/sh./etcd --name etcd-server-80-30 \\
       --data-dir /data/etcd/etcd-server \\
       --listen-peer-urls https://192.168.80.30:2380 \\
       --listen-client-urls https://192.168.80.30:2379,http://127.0.0.1:2379 \\
       --quota-backend-bytes 8000000000 \\
       --initial-advertise-peer-urls https://192.168.80.30:2380 \\
       --advertise-client-urls https://192.168.80.30:2379,http://127.0.0.1:2379 \\
       --initial-cluster  etcd-server-80-20=https://192.168.80.20:2380,etcd-server-80-30=https://192.168.80.30:2380,etcd-server-80-40=https://192.168.80.40:2380 \\
       --ca-file ./certs/ca.pem \\
       --cert-file ./certs/etcd-peer.pem \\
       --key-file ./certs/etcd-peer-key.pem \\
       --client-cert-auth  \\
       --trusted-ca-file ./certs/ca.pem \\
       --peer-ca-file ./certs/ca.pem \\
       --peer-cert-file ./certs/etcd-peer.pem \\
       --peer-key-file ./certs/etcd-peer-key.pem \\
       --peer-client-cert-auth \\
       --peer-trusted-ca-file ./certs/ca.pem \\
       --log-output stdoutEOF#在mfyxw40.mfyxw.com主机创建etcd启动脚本[root@mfyxw40 ~]#cat > /opt/etcd/etcd-server-startup.sh << EOF#!/bin/sh./etcd --name etcd-server-80-40 \\
       --data-dir /data/etcd/etcd-server \\
       --listen-peer-urls https://192.168.80.40:2380 \\
       --listen-client-urls https://192.168.80.40:2379,http://127.0.0.1:2379 \\
       --quota-backend-bytes 8000000000 \\
       --initial-advertise-peer-urls https://192.168.80.40:2380 \\
       --advertise-client-urls https://192.168.80.40:2379,http://127.0.0.1:2379 \\
       --initial-cluster  etcd-server-80-20=https://192.168.80.20:2380,etcd-server-80-30=https://192.168.80.30:2380,etcd-server-80-40=https://192.168.80.40:2380 \\
       --ca-file ./certs/ca.pem \\
       --cert-file ./certs/etcd-peer.pem \\
       --key-file ./certs/etcd-peer-key.pem \\
       --client-cert-auth  \\
       --trusted-ca-file ./certs/ca.pem \\
       --peer-ca-file ./certs/ca.pem \\
       --peer-cert-file ./certs/etcd-peer.pem \\
       --peer-key-file ./certs/etcd-peer-key.pem \\
       --peer-client-cert-auth \\
       --peer-trusted-ca-file ./certs/ca.pem \\
       --log-output stdoutEOF温馨提示:--data-dir:数据目录的路径--listen-peer-urls:监听在对等节点流量上的URL列表,该参数告诉etcd在指定的协议://IP:port组                     合上授受来自其对等方的传入请求。协议可以是http或https。或者使用                           unix://<file-path>或unixs://<file-path>到unix sockets。如果将                         0.0.0.0作为IP,etcd将监听在所有的接口上的给定端口。如果给定了IP和端                       口,etcd将监听指定的接口和端口。可以使用多个URL指定要监听的地址和端口                     的数量。etcd将响应来自任何列出的地址我端口的请求--listen-client-urls:监听在客户端流量上的URL列表,该参数告诉etcd在指定的协议://IP:port组                       合上接受来自客户端的传入请求。协议可以是http或https。或者使用                             unix://<file-path>或unixs://<file-path>到unix sockets。如果将                         0.0.0.0作为IP,etcd将监听在所有的接口上的给定端口。如果给定了IP和端                       口,etcd将监听指定的接口和端口。可以使用多个URL指定要监听的地址和端                       口的数量。etcd将响应来自任何列出的地址我端口的请求--quota-backend-bytes:后端大小超过给定配额时引发警报(0默认为低空间配额)--initial-advertise-peer-urls:此成员的对等URL的列表,以通告到集群的其余部分。这些地址用                                于在集群周围传送etcd数据。所有集群成员必须至少有一个路由。                                这些URL可以包含域名
 --advertise-client-urls:此成员的客户端URL的列表,这些URL广播给集群的其余部分。这些URL可                           以包含域名,默认值为:http://localhost:2379,如果从集群成员中发                           布诸如http://localhost:2379之类的URL并使用etcd的代理功能,请                           小心,这将导致循环,因为代理将向其自身转发请求,直到其资源(内                             存,文件描述符)最新耗尽为止。
 --initial-cluster:启动集群的初始化配置,关键是所提供的每个节点的--name参数的值
 --ca-file:客户端服务器TLS CA文件的路径
 --cert-file:客户端服务器TLS证书文件的路径
 --key-file:客户端服务器TLS秘钥文件的路径
 --client-cert-auth:开启客户端证书认证
 --trusted-ca-file:客户端服务器受信任的TLS CA证书文件的路径
 -peer-ca-file:节点TLS CA文件的路径 --peer-cert-file:对等服务器TLS证书文件的路径
 --peer-key-file:对等服务器TLS秘钥文件的路径,这是对等节点通信秘钥,在服务器和客户端都可                   以使用
 --peer-client-cert-auth:启动节点客户端证书认证
 --peer-trusted-ca-file:节点受信任的TLS CA证书文件的路径
 --log-output stdout:指定"stdout"或"stderr"以跳过日志记录,即使在systemd或逗号分隔的输                       出目标列表下运行时也是如此
9.为Etcd启动文件授予可执行权限
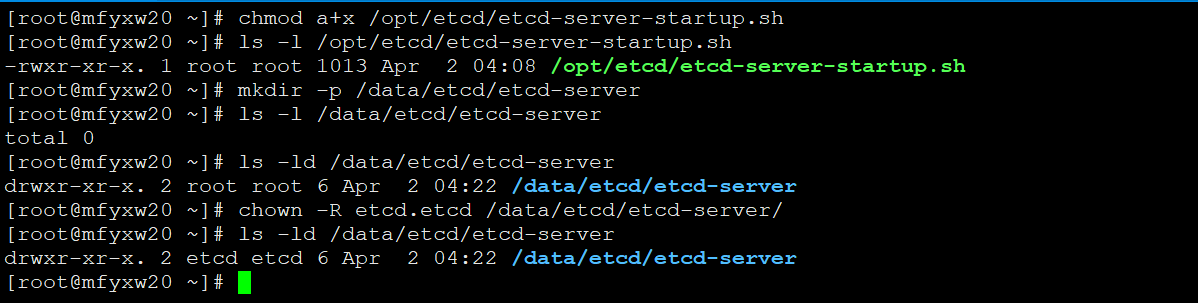
#为Etcd启动文件(mfyxw20)授权,其它二台主机都类似[root@mfyxw20 ~]#chmod a+x /opt/etcd/etcd-server-startup.sh

10.创建Etcd数据目录**
#第8步的etcd启动文件中有涉及配置了存储etcd数据目录,故需要创建目录并授权给etcd用户和组#本例以mfyxw20主机为例,其它二台主机类似[root@mfyxw20 ~]#mkdir -p /data/etcd/etcd-server[root@mfyxw20 ~]#chown -R etcd.etcd /data/etcd/etcd-server/
11.为了方便管理etcd后台进程,安装supervisor
#mfyxw20,mfyxw30,mfyxw40三台安装etcd的主机都需要安装[root@mfyxw20 ~]#yum -y install supervisor
12.为supervisor提供配置文件、
#mfyxw20,mfyxw30,mfyxw40都需要提供supervisor配置文件#mfyxw20机器的supervisor配置文件[root@mfyxw20 ~]#cat > /etc/supervisord.d/etcd-server.ini << EOF[program:etcd-server-80-20]command=/opt/etcd/etcd-server-startup.sh
numprocs=1
directory=/opt/etcd
autostart=true
autorestart=true
startsecs=30
startretries=3
exitcodes=0,2
stopsignal=QUIT
stopwaitsecs=10
user=etcd
redirect_stderr=true
stdout_logfile=/data/logs/etcd-server/etcd.stdout.log
stdout_logfile_maxbytes=64MB
stdout_logfile_backups=4
stdout_capture_maxbytes=1MB
stdout_events_enabled=false
EOF#mfyxw30机器的supervisor配置文件[root@mfyxw30 ~]#cat > /etc/supervisord.d/etcd-server.ini << EOF[program:etcd-server-80-30]command=/opt/etcd/etcd-server-startup.sh
numprocs=1
directory=/opt/etcd
autostart=true
autorestart=true
startsecs=30
startretries=3
exitcodes=0,2
stopsignal=QUIT
stopwaitsecs=10
user=etcd
redirect_stderr=true
stdout_logfile=/data/logs/etcd-server/etcd.stdout.log
stdout_logfile_maxbytes=64MB
stdout_logfile_backups=4
stdout_capture_maxbytes=1MB
stdout_events_enabled=false
EOF#mfyxw40机器的supervisor配置文件[root@mfyxw40 ~]#cat > /etc/supervisord.d/etcd-server.ini << EOF[program:etcd-server-80-40]command=/opt/etcd/etcd-server-startup.sh
numprocs=1
directory=/opt/etcd
autostart=true
autorestart=true
startsecs=30
startretries=3
exitcodes=0,2
stopsignal=QUIT
stopwaitsecs=10
user=etcd
redirect_stderr=true
stdout_logfile=/data/logs/etcd-server/etcd.stdout.log
stdout_logfile_maxbytes=64MB
stdout_logfile_backups=4
stdout_capture_maxbytes=1MB
stdout_events_enabled=false
EOF

分别给/opt/etcd/cert目录授权
#mfyxw20、mfyxw30、mfyxw40都需要分别执行[root@mfyxw20 ~]#chown -R etcd.etcd /opt/etcd/certs/[root@mfyxw30 ~]#chown -R etcd.etcd /opt/etcd/certs/[root@mfyxw40 ~]#chown -R etcd.etcd /opt/etcd/certs/
13.创建supervisor日志目录并授权
#三台安装了supervisor的都需要执行如下命令,以mfyxw20为例[root@mfyxw20 ~]#mkdir -p /data/logs/etcd-server/[root@mfyxw20 ~]#chown -R etcd.etcd /data/logs/etcd-server/

14.为supervisor添加开机自启及立即启动服务
#三台安装了supervisor的机器都需要执行如下操作,以mfyxw20为例[root@mfyxw20 ~]#systemctl enable --now supervisord

15.查看etcd是否已经启动
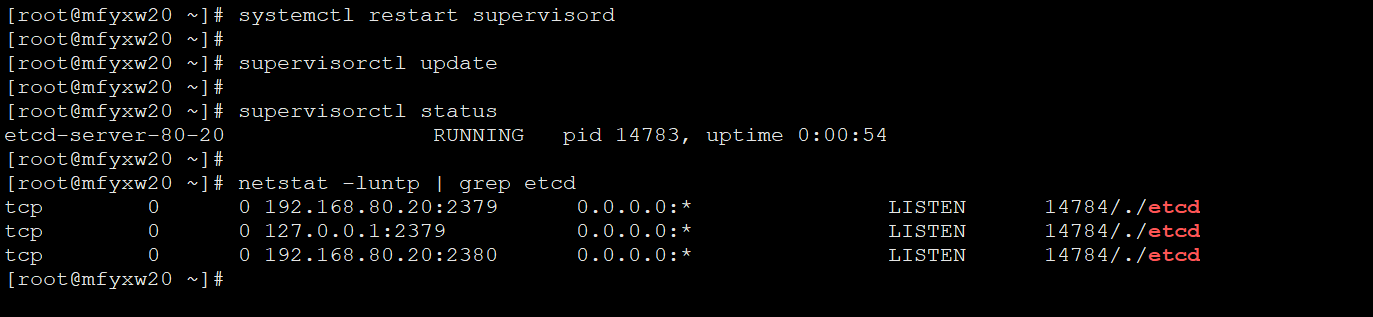
#三台安装了supervisor的机器都需要执行如下操作,以mfyxw20为例[root@mfyxw20 ~]#systemctl restart supervisord[root@mfyxw20 ~]#supervisorctl update[root@mfyxw20 ~]#supervisorctl status[root@mfyxw20 ~]#netstat -luntp | grep etcd
16.查看Etcd集群状态信息
#在安装好的三台etcd节点(mfyxw20,mfyxw30,mfyxw40)上,进入到etcd相对应的目录,以mfyxw20为例[root@mfyxw20 ~]#cd /opt/etcd[root@mfyxw20 etcd]#./etcdctl member list

目录 返回
首页